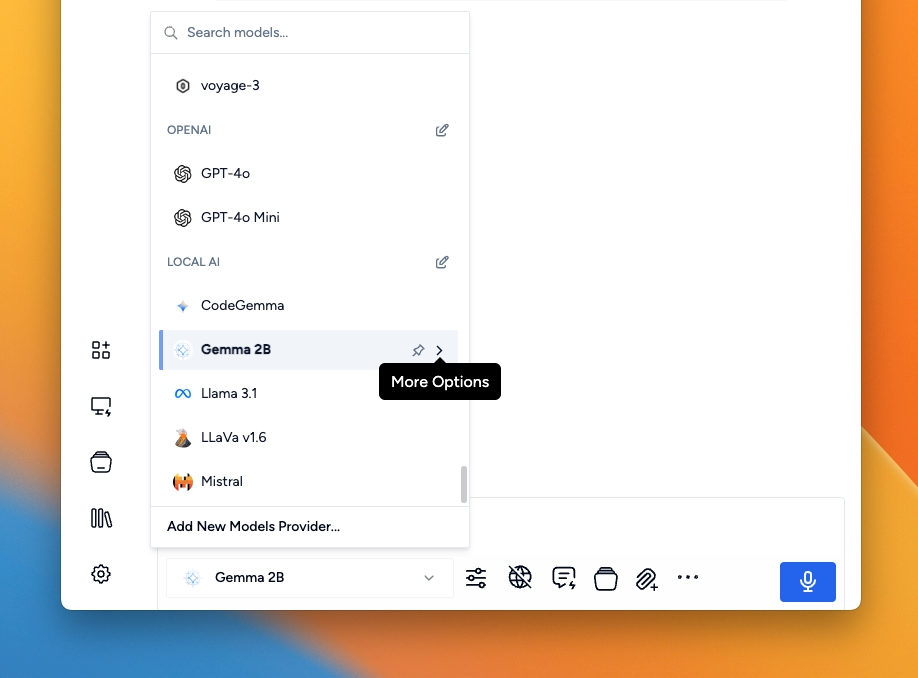
Model Selector
A unified model selection and configuration tool
If you're looking for the Msty Studio documentation instead, you can find it here: Go to Msty Studio Docs →
Learn more about Msty Studio at Msty.ai →
The text chat model selector in Msty provides a flexible way to choose between a variety of models, whether from remote providers such as OpenAI and Open Router, or local models hosted on your own machine.
With recent improvements, users now have enhanced control over how models are organized and accessed. This includes the ability to pin frequently used models, assign specific categories to models, and configure additional settings for local models.
Pinning Models for Easy Access
To streamline workflows, users can now pin models to the top of the model selector list. This feature is particularly useful for models that are used frequently, allowing for quicker selection without needing to scroll through a long list of options.
How to Pin a Model:
- In the model selector list, hover over the desired model.
- Select the "Pin" icon next to the model name.
- The pinned model will now appear at the top of the list until unpinned.
Model Categories for Remote Models
Remote models often serve different purposes, such as handling text-based tasks, embedding generation, vision-related processes, or code-related outputs. To make it easier to find the right model for a specific task, users can assign a category to each remote model.
Available Categories:
- Text: For models designed to generate or interpret text.
- Embedding: For models focused on generating vector embeddings.
- Vision: For models specialized in image and vision-based tasks.
- Coding: For models designed to handle code generation or interpretation.
How to Assign a Category:
- Open the model's sub-menu by clicking on the "Chevron" icon next to the model name.
- Choose the appropriate category (Text, Embedding, Vision, or Coding) and click Update.
Configuring Local Models
For local models, users have even more control, including the ability to set a custom prompt template, assign a model label, or categorize the model, just like with remote models. This allows for a tailored experience when working with locally hosted models, making sure they fit seamlessly into your workflow.
Customizations for Local Models:
- Prompt Template: Define a standard prompt format to be used every time the model is called.
- Model Label: Assign a recognizable label to the model to make it easier to identify.
- Model Category: Assign the model to a category (Text, Embedding, Vision, or Coding) for easier navigation.
How to Configure Local Models:
- Hover over the local model in the selector.
- From the options menu, select the “Customize” option.
- Configure the prompt template, label, or category as needed.
The improvements to the model selector make managing and using various models more efficient, whether they are from remote providers or hosted locally. These enhancements ensure that users can quickly access the models they need, with the ability to organize and customize them for specific tasks.
